HOW TO HEALTHY LIVING? LET TAKE CARE OF YOUR LIFE

Recipe: Broccoli Pizza


If you've decided on a vegetarian diet , you want to try the diet of negative calories or just want to try a delicious pizza that is also nutritious , this is the recipe for you.
Note that while you can include more fresh ingredients in the recipe (and less canned or preserved) be much better, plus you'll be ensuring that you retain all the nutrients (or most of them). For example, instead of using canned tomato puree, you can choose to make your own puree with fresh tomatoes. A good tip is to roast the tomatoes and simmer liquefy and be ready with your favorite spices.
Also remember that although our option presented here has broccoli as a main ingredient you can include as many vegetables you want (and if you are in this list , the better).
Ingredients to make the dough (500 gr):
  • 250g flour
  • 3 tablespoons olive oil
  • 10gr of yeast
  • 5g fine salt
  • 10gr sugar
  • 185 cl. water
Ingredients for coverage:
  • 1/4 of broccoli
  • 300 grams of cheese
  • 200 grams of mozzarella
  • 4 egg yolks
  • 1 cup tomato puree
  • 1 clove of garlic
  • parsley
  • oregano
  • olive oil
Preparation of the dough : Dissolve the salt and sugar in half the water. Mix flour and brewer's yeast desmigándolo finely in a saucepan (sounds funny but has a reason) and mix with the rest of the water, then mix with the salt water and sugar (brewer's yeast does not support too much contact with the salt). Knead vigorously for 5 minutes. Gradually stir the oil, mixing continues for another 3 minutes until the dough comes away easily from the pan. Flour dough into a little ball. Put in slightly floured pan and recúbrelo with a plastic sheet.
To lift the dough : In summer, let the dough rise at room temperature, in winter, place the pan in a water bath for Humid 25 ° C. Do not leave it up to excess (the dough should double in volume).
Breaking and leave the dough : flour a little dough by folding on itself numerous times. With a thin plastic wrap and leave in the fridge for 1h 30m
Tips. Prepares Eve mass, will be better. To store it in a refrigerator that does not ferment
Preparation of pizza:
After preparing the pizza dough and having pre-cooked in the oven, cut the garlic finely and add it to the tomato puree along with parsley.
In another pot cook the broccoli, cut them and put them on the base. Then, place the mozzarella slices on top and then cover with cheese.
Slightly beat the egg yolks and sprinkle the pizza with them. We put it in the oven for about 10 minutes or so until golden brown.
 Served and ready to enjoy.

Banana berry smoothie

Banana berry smoothie

Plain nonfat yogurt helps to boost the protein in this fruit-flavored easy to make drink.

Serves: 4
Ingredients
2 cups plain nonfat yogurt
1 medium size ripe banana, peeled, sliced
1/2 cup Equal® Spoonful or Granulated*
2 tablespoons lemon juice
2 cups frozen unsweetened whole strawberries
1 cup frozen unsweetened red raspberries

*May substitute 12 packets Equal® sweetener
Preparation
Combine yogurt, banana, Equal® and lemon juice in blender or food processor; cover. Blend until smooth.
Add half of frozen fruit. Blend until smooth. Repeat with remaining frozen fruit.
erve immediately in tall glasses.
Nutrition Information
Calories: 147
Total Fat: 0 g
  Saturated Fat: 0 g
Cholesterol: 3 mg
Sodium: 121 mg
Total Carbohydrate: 31 g
Protein: 9 g
Food Exchanges: 1 milk, 1 1/2 fruit

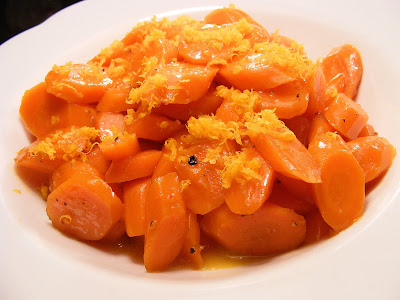
Maple glazed orange carrots


Maple glazed orange carrots

A flavorful side dish for any meal.
Number of Servings: 5
Prep time: 4 minutes
Cook Time: 6-8 minutes
Ingredients:
1-1/2 lbs. (4 cups) baby carrots
5 Tbsp Cary’s® Sugar Free Syrup
2 Tbsp orange juice
1 Tbsp butter or margarine
1 Tbsp orange zest
Preparation:
Toss all ingredients together in microwave bowl. Cover with plastic wrap. Microwave on high for 5 minutes. Toss and cover. Microwave on high for an additional 1-3 minutes. Carrots should be fork tender with a hint of crispness. Toss and serve immediately.
Variation:
This vegetable dish is a tangy, colorful, healthy and flavorful side dish for any poultry, meat or fish. Substitute lemon juice and lemon zest for the orange. Grapefruit juice and orange peel make a great combination with the carrots.
Nutritional Information:
Calories: 74
Total Carbohydrates: 11 g
   Dietary Fiber: 2 g
Total Fat: 2 g
   Saturated Fat: 1 g
Cholesterol: 13.35 mg
Sodium: 103 mg
Protein: 1 g
Exchanges: 1 vegetable, 1/2 carbohydrate

Kesar Rice


Ingredients 
  • 1 cup basmati rice 
  • 1 cup sugar 
  • few strands saffron crushed 
  • 1 tsp. chopped pistas & almonds 
  • 1/2 tsp cardamon powder 
  • 1 small piece cinnamon 
  • 4 cloves, 1 tbsp small raisins 
  • 1/2 cup pure ghee 
  • a little saffron colour dissolved in 2 tsp water. 

Method 
  1. Boil rice in plenty of water. Do not add salt. 
  2. When the rice is just about but not yet done, drain and cool. 
  3. Add sugar, colour, cardamon and saffron. 
  4. Heat ghee in a heavy sauce pan, add cloves, cinnamon raisins and rice. 
  5. Gradually cook and store till occasionally without breaking the grain. 
  6. When the water dries up add the chopped dry fruits on top. 
  7. Serve hot.Take care not to burn the seasoning. 
  8. Add curd, milk, coriander. 
  9. Mix well and cool in fridge for an hour before serving. 

The Lentil Challenge

Unlike popular Indian desserts, most Konkani desserts are not dairy-based. While the use ofcoconutjaggery and cardamom is a given, they are usually combined with fruits, rice or lentils. Madgane is not a dessert in the traditional sense. We don't make it as a last course to a Sunday lunch for instance. It has rather richer associations - weddings, the Hindu New year and for me 'devasthan jewan' (meals eaten in a temple).

During the festival at our temple in Goa, after the puja was done, we would race to the lunch area a little distance away. This was not because we were very hungry (well not always) but because the road was blistering hot under the afternoon sun and we were barefoot. The entire lunch was delicious of course, but in my eyes it was the madgane that truly made the hotfooting (pun totally intended :-)) worthwhile.

Madgane is quite rich because it is made with a lot of coconut milk. I have reduced the amounts keeping in mind that I have indulged my sweet tooth a little too often in the past few weeks! I used a readymade tin of coconut milk; this obviously won't taste the same as freshly extracted milk but it sure cuts down the hassle and time.

madgane
MADGANE (Lentil Pudding)
(serves 2-3)
1/3 cup split bengal gram (chana dal)
6-8 cashews, halved
1/2 cup grated jaggery (adjust to taste)
1 cup coconut milk
1/2 tsp cardamom powder

Wash dal in 2-3 changes of water. Drain, then add about a cup of water and soak along with cashews for an hour.

Transfer to a deep bottom pan, add one more cup of water and cook until dal is tender. Do not overcook the dal; it should be soft but able to hold its shape. Add more water in batches if necessary.

Carrot Cake Recipe


There will be a special place in my baker's heart for the first project I undertook post-baby, and I take it as a fine omen that it is also an exceptionally good cake, one I have already baked again twice since then.
Our son (it still feels surreal typing these words) is now six weeks old, he is thriving, and although the first weeks were challenging in ways I had been told about but couldn't truly penetrate until I experienced them firsthand, our little family is finding its rhythm and every day brings new reasons to feel lucky that we landed this particular charming baby.
We have had friends and family come over to meet Milan, and it is on one of these occasions that, feeling uncannily energetic after a night during which the little guy only woke us up every three hours -- consider our drastically lowered sleep standards -- I decided to bake a cake for our guests.
The recipe is drawn (and marginally adapted*) from a fun new book by Julie Andrieu, a French cook, food writer, and television personality who gathered dessert recipes that use vegetables.
Her carrot cake is among the more classic items in this collection, but it is the one I was drawn to the most: one, because I have to steer clear of dairy for breastfeeding reasons, and this cake uses oil as the source of fat; two, the ingredients list and process were simple enough for my circumstances and I only needed to buy the carrots; and three, I adore carrot cakes but had yet to adopt a particular recipe as a standard in my repertoire.
On the eve of baking day I measured out the ingredients and grated the carrots, and on the day of I assembled the batter and plopped the cake into the oven, all with the baby sleeping against me in his wrap -- an absolute godsend if you're the kind of person who likes to use both of your hands every once in a while.
It was a truly wonderful cake: moist and flavorsome and lightly nubby from the use of cornmeal, with a thin crust on top and the meaty crunch of pecans punctuating every bite, we ate it with an enthusiasm that nearly matched that with which we discussed the important matter of whose eyes and whose nose and whose mouth the baby seems to have taken (the consensus, respectively: mine, Maxence's, as yet undetermined).
* Here are the elements I modified from the original version: I lowered the amount of sugar a bit, and the amount of spices as well (I prefer a gently spiced carrot cake); I doubled the amount of cornmeal and added salt; I skipped the diced candied orange rind; I used pecans in place of walnuts ; I changed the order in which the ingredients are combined to follow the simple rule of wet ingredients vs. dry ingredients.

Pecan Carrot Cake
- 175 grams (1 cup minus 2 tablespoons) unrefined cane sugar
- 3 large eggs
- 120 ml (1/2 cup) olive oil or other oil
- 500 grams (1 lb 2 oz) carrots, peeled and grated
- 130 grams (1 cup) all-purpose flour (I used the French T65)
- 40 grams (1/3 cup) cornstarch
- 1 1/2 teaspoons baking powder
- 40 grams (1/4 cup) cornmeal
- 1 teaspoon warm spice mix (such as quatre-épices or pumpkin pie mix, containing cinnamon, cloves, nutmeg, and ginger)
- 1/2 teaspoon fine sea salt
- 125 grams (1 1/4 cups) pecans or walnuts, toasted if possible, coarsely chopped
Grease a 9 x 5-inch / 23 x 12-cm loaf pan with oil and preheat the oven to 160°C / 320°F.
In a large mixing bowl, whisk together the sugar and eggs for a minute. Whisk in the olive oil, and fold in the carrots.
In a medium bowl, combine the flour, cornstarch, baking powder, cornmeal, spices, salt, and pecans until combined. Fold into the wet ingredients, taking care not to overwork the batter.
Pour into the prepared pan and bake for 1 hour, until a cake tester comes out clean. Let rest on a rack for 30 minutes before turning out, and let cool completely before serving.

Nankatai

I was asked a couple of days back by my son's teacher if I would like to come to school to celebrate Diwali Day. They were celebrating it a little after Diwali as the school had it's half term break exactly during the Diwali break. I was asked whether I would be interested in doing some cooking so that the children could have a taste of some Indian food. I was definitely interested and it really got me thinking as to what I could make. It had to be something that children found attractive , didn't take too much time to cook and had an Indian touch to it. Making Diwali snacks was totally out of question as we all know that most of the snacks that we prepare for Diwali are very very time consuming and also require concentration.
So I asked Google for advice and I also did some blog hopping but finally the idea came completely on it's own accord . " Nankatai": The delicious Indian cookie. I knew it was a great idea as it is quick to make does not require too many ingredients and as the school has a oven baking was no problem. I had also seen it being made on UKTV Food by a very talented Indian Celebrity chef and I thought if he can make such a simple dish on national television I could definitely present it in my son's school. But before I finalised it I had to take a trial at home . The quantity of each ingredient had to be determined and how many cookies would I make in one batch. And so I did. I followed a recipe from here with a few changes here and there of my own.
Ingredients:
  • 1 cup maida (plain flour)
  • 1 tsp baking powder
  • 1/2 cup ghee (clarified butter)
  • 1/2 cup castor sugar
  • 2 tsps chopped almonds
  • 1 tsp cardamom powder
  • 1/4 tsp saffron soak in 1 tbsp hot water
Method:
Seive flour and baking powder together. Mix ghee and sugar till creamy. Add the flour mixture,the saffron and cardomom . Knead well and make into small balls. Flatten and place on lined tray. Dip a fingertip in water and dab on the centre of each ball of dough. Bake in oven till cooked for about 20-25 mins at 375 deg.

Nankatai (Earthquake cookies?)
Now what actually happened is that after I made these ,tasted them and passed a satisfactory verdict on them I spoke to a friend about them . She was of the opinion that although Nankatai was a great recipe to make as such , all said and done it was a biscuit; a biscuit that tasted very similar to Scottish Shortbread which most children in UK have eaten thousands of times. So would it not be better to do something else a bit more Indian.

She suggested Instant Dhokla and I came up with the idea of Amrakhand. And these are to the 2 dishes that finally made it to the school Diwali celebrations. I hung 1 kilo of Greek Style yoghurt overnight . In the morning I mixed in sugar and cardammom in it. After putting it in a plastic container it was ready to carry to the school. Along with I took along a can of Alphonso mango pulp so that the children could mix the pulp and the yoghurt themselves and make their own Amrakhand
A Gujarathi Treat
I also took a pack of Gits Dhokla mix and my idli stand to the school. Within minutes of arriving at the cooking area I had the first batch of idli shaped Dhoklas ready . I offered the children the choice of topping their Dhoklas with fresh coriander and coconut and a tempering of mustard but most of them were happy just munching on the plain Dhoklas. A few even asked for seconds and I was so thrilled.
Festive Mango Amrakhand
The Amrakhand idea was also a complete hit. The kids loved mixing mango with yogurt and polished off all the Amrakhand from their little cups before asking for seconds and also thirds. You can imagine how nice it felt . The teachers were also very happy with the way things went and they too got a sampling of the Dhokla which they loved.

Mango Mastani


My memories of enjoying a Mango Mastani go back a long long way, right to the time when I was about 10 years old. I mean today Pune has some fabulous Mastani places where the Mastani is sold in many different flavours but back then my dad used to take us to a small place , a stall actually, located at Saras Baug (readers from Pune will know the location ) . It was called Vasant Cold Drink House . It belonged to a friend of my dad's and he and sold the most awesome Mango Mastani made from fresh Alphonso mangoes and made in a hand turned ice cream maker. Eating this Mastani was a luxury and at a price as low as Rs.10.00 per glass it was practically free considering today's prices. A Mastani today costs around Rs.60.00 to 70.00 at Sujata Mastani in Pune .

So every time I think of Mastani I always remember that small place which gave me my first taste of this beautiful beautiful dessert. No wonder it's also got this royal name . Mastani was a danseuse and wife to Bajirao Peshwa . She was a stunning combination of beauty and bravery that history recollects and it is said that her skin was as smooth and delicate as porcelain. Well our Mastani is just as beautiful, don't you think?

So here's my version of the Mango Mastani:
As it the Mango season I used fresh mangoes but otherwise just go ahead and use canned mango pulp, but preferably Alphonso mango.

To make 2 tall glasses of Mastani you need:Pulp of 1 large Alphonso Mango or 2 medium ones (or of course the equivalent in canned pulp)
1.5 glasses of cold whole milk,
4 tpns sugar
lots of ice cubes
And good quality mango icecream or mango kulfi (I used kulfi)

Method:Whizz up the milk ,mango , sugar and ice in a blender until thick and frothy. Pour out into tall glasses upto three quarters. Then put in 2 scoops of mango icecream on the top and decorate with cubed mango and some whipped cream . Put in a straw and a long spoon and serve chilled. Or drink it and go straight to heaven.

Other good variations are :Rose milkshake and mango icecream,
Rose milkshake and pistacchio icecream,
Strawberry milkshake and vanilla icecream
But of course nothing comes close to the total mango version.

Kesar Rasmalai


Blogging has changed my outlook towards cooking. Cooking for me is no more just something that I do to fill our stomachs but it has acquired a completely different facet. I go to extreme lengths now to make the food look as good as it tastes. And when there is a blog event that challenges me to bring out the best in me I am definitely game. That's exactly what Meeta's Monthly Mingle has done. The theme she has presented us (or rather challenged us with) this month is Bollywood Cooking. It's a fabulous theme with a wide variety of dishes to explore. Glamorous as Bollywood is , I thought my dish had to be equally glamorous . And my Kesar Rasmalai is just that. It's elegant, sophisticated, and has just the right balance sweetness and creaminess. I also wanted to try out something from a different culture than mine.
The other reason why I chose to make a Bengali sweet like Rasmalai is to celebrate all the beautiful Bengali actresses in Bollywood. Right from the beautiful Suchitra Sen and talented Aparna Sen, Jaya Bhaduri and Sharmila Tagore to current heartthrobs like Rani and Bipasha, Sushmita and Konkana the Bengali babes have ruled the silver screen in every decade. So here's to you girls!
Coming back to the recipe now, I an really surprised myself as to how well it came out. It is not difficult at all just a bit time consuming. My suggestion to all those who try it out is to make it at leisure when you have plenty of time on hand. Preferably when hubby and kids are out of the way.
Ingredients :For the malai (or paneer balls):
1 lt cow milk,
1/4 cup lemon juice or ordinary vinegar, 
6 cups water to cook the balls,
1 cup sugar,
1 tspn cardamom powder,
1 tray of ice cubes to be kept handy.
Ingredients for the flavoured milk:
1 can 400 gms evaporated milk,
750 ml whole milk,
15 tspns sugar,
1 tspn saffron soaked in a little warm milk,
1 tspn cardamom powder
Method for Malai balls:
1. Boil the milk in a heavy bottom pan.
2. Add to it the lemon juice when the milk begins to rise. This will instantly curdle the milk. As soon as the milk curdles switch off the gas and pour in the ice cubes to stop the cooking at once. Place a lid on the pan for a few minutes.
3. Remove the lid and strain the curdled milk through a clean muslin which is placed in a colander. Wash the paneer under running water to remove all the traces of the lemon juice. 
4. Tie the ends of the muslin and hang the paneer for at least 1/2 hour so that all the water in it is completely drained out.
5. Meanwhile mix the evaporated milk and the whole milk and put on the heat to boil in a non-stick pan . Once it comes to a boil lower the heat to minimum and continue stirring the milk until it thicken just a little. This will take about 1/2 an hour. Continuous stirring is important or the milk might stick to the bottom of the pan and burn.
6.Once the milk thickens switch off the gas ,stir in the sugar , saffron and cardamom powder. Keep aside and let it cool a bit.
7. Before removing the paneer from the muslin give it a gentle knead through the muslin so that it comes out smooth in texture.
8. Now roll out small balls and flatten them slightly with your palm. Just like to see in the pic below. 1 litre of milk will make about 15 . Balls should not be too big as they do swell after they are cooked in the sugar and water syrup.9. Boil the 6 cups of water and 1 cup of sugar in a large pan till sugar dissolves. The syrup should be kept boiling on a high flame when you drop the paneer balls in it. This is very important. If the lower the heat the balls will simply break in the water and disintegrate. Place a lid over the pan and let the paneer balls cook for 6 to 7 minutes on high flame.10. They rise to the top and get fine cracks on the surface when they are completely cooked. To remove them first take a few ladles of the hot syrup in a bowl and then place the cooked balls from the pan into this bowl. They stay intact and firm when they are kept in liquid. Let them cool down a bit . 
11. When you add the paneer balls to the flavoured sweet milk remember that the balls and the milk should both be lukewarm. Add the balls gently to the milk and place in the fridge to cool the dish thoroughly before serving. This dish is best made one day in advance. Before serving garnish generously with sliced almonds and pistachios for that special touch.

Carrot Halwa

halwa2


As the winter months of November and December draw near in India, one can see mounds of plump carrots in vegetable markets, eye catching in all their orange glory amidst the green. The most popular and beloved dish made with carrots is the carrot halwa.

It is a perennial favorite at all feasts, particularly wedding buffets. Though caterers experiment with everything from Chinese to Italian today, carrot halwa still holds it's pride of place among desserts. Carrot halwa with vanilla ice cream = a marriage budget well spent! A bite of warm, rich, gooey halwa with cold vanilla ice cream is heavenly, as most people will agree.

As with any popular dish, there are several versions of this dessert. My version has khoya (dried milk) in it. Khoya (or mawa) is used in a lot of Indian desserts to get a creamier taste. Over the years I tried several ways of making this halwa but I never quite managed to recreate the authentic mithai-shop kind of taste. Then I read in a magazine how the carrots ought to be sauteed over high heat and voila, I had the real deal. No more experimenting for me!

It is a slightly labor intensive recipe what with the constant stirring, but believe me the end result will more than compensate for it. In fact you might just give a Bollywood 'maa' a run for her 'haath ka gajar halwa' :-)


halwa1
GAJJAR HALWA (Carrot Pudding)
(for 2-3 portions)
2 cups grated carrots
4 cups whole milk
1 1/2 cup sugar (adjust to taste)
2 tsp khoya crumbled (optional) *
1/2 tsp green cardamom powder
a handful of cashews chopped
2 tsp Ghee

Heat a teaspoon of ghee in a sauce pan. Fry cashews till they are golden. Remove and keep aside.

Combine milk, carrots and cardamom powder in a large sauce pan. Bring to a boil, stirring frequently. Turn heat to medium high and cook until milk is completely absorbed.

Add sugar and stir until it dissolves and carrots get a glaze. Spoon remaining ghee into pan and saute over medium high heat. Mix in khoya and stir until you can collect halwa in a ball. Remove from fire. 

Garnish with cashews and serve warm.
* You don't need to make a huge quantity of khoya for this halwa. Microwave 3 tablespoons of condensed milk, 1 teaspoon of ghee and 1 teaspoon of yogurt for 2 minutes (checking after 30 second intervals). Chill until ready to use.
* For carrot kheer bring milk to a boil but don't let it reduce entirely


Top Seven Cooking Lessons


Here at Food and Health Communications, we just love to cook. Lately, we’ve been thinking about the most important cooking lessons for a healthful lifestyle, which led us to create our Top Seven Cooking Lessons for Health series. This free set of nutrition handouts is chock full of useful information. It covers everything from crafting the best bowl of oatmeal to steaming vegetables perfectly. To access these handouts, simply visit our store and sign up for the emails. In the meantime, here are a few highlights from the series…

Looking to braise fish or poultry? Choosing the right cut of meat can be tricky. That’s why we’ve listed some of the best options below…
  • Choose white meat, not dark meat, when selecting poultry. Breast meat, for example, is an excellent choice.
  •  Skip the bones and leave the skin off of any pieces of chicken you choose.
  • Braising works best with larger, firm-fleshed fish like salmon, swordfish, or striped bass.
Looking for a quick nutrient boost in the morning? Try whirring up a smoothie! Our handout discusses all the great ingredients and preparation tips, but presentation also matters. Check out our serving suggestions below..
  • If you’re rushing out the door, pour your smoothie into a travel mug or a cup with a lid and straw.
  • Smoothies look especially elegant in tall, thin glasses.
  • Top your smoothie with a sprinkling of fresh fruit or a dusting of cinnamon.
  • Smoothies make great replacements for ice cream or other sweet treats. Consider that the average smoothie has just 100 calories per cup, while ice cream can have over 300 calories per cup!
As the weather gets cooler, your mornings may be calling out for a toasty treat. Try oatmeal! When made the right way, oatmeal is anything but boring. Not sure where to start? Read through our topping tips!
  • Top cooked oatmeal and dried fruit with a bit of lemon juice and zest.
  • Unsweetened frozen fruit is a perfect topping, especially since it creates its own “sauce” as it defrosts. Try heating up blueberries with a pinch of cinnamon!
  • For a dish that tastes like fresh banana bread, stir in sliced bananas and a dash of maple extract.
  • Chop a handful of unsalted nuts or seeds and scatter them over your bowl.
  • Feeling festive? Add a half cup of pumpkin puree and a pinch of nutmeg.
Whether you’re crafting breakfast, lunch, dinner, or a healthful snack, MyPlate is a great resource for keeping portions under control and making a balanced meal. Why MyPlate? Well…
  • MyPlate is a fantastic resource for healthful, balanced eating.
  • It offers a great visual guide that is easy to apply in real life.
  • For example, applying MyPlate’s tenets to a plate of fish and chips can make the new plate 688 calories lighter. Doing the same for a burger and fries can bring the new dish’s calorie count down from 940 to 300 calories.
  • MyPlate offers great ways to reduce calories without limiting flavor.
Want to get all the nutrients from vegetables without adding a lot of fat or salt? Try steaming! There are two great ways to steam veggies…
  • Place a steamer basket in a saucepan and add water. Fill until the water is about 1/2 inch from the bottom of the steamer. Bring the water to a boil. Once it is happily bubbling away, place your veggies in the basket. Cover the pan with a lid, then check the progress every few minutes, cooking until everything is tender but still crisp.
  • Don’t want to mess with the stovetop? Place your chopped veggies in a microwave-safe container. Sprinkle with water, cover, and microwave on high until they are crisp-tender, about 8 minutes.
What better way to serve steamed veggies than with a big bowl of brown rice? Our penultimate handout discusses tips and tricks for crafting the perfect bowl of brown rice. To boost the flavor of your rice, why not add any the following before you cook it?
  • Bay leaves (just one is plenty) add a simple, savory flavor.
  • Paprika and smoked paprika add color.
  • Dried basil, rosemary, oregano, or thyme combine for a great Italian seasoning blend.
  • Chili powder and cumin go together for a Latin flair.
  • Briefly cook a bit of chopped garlic and veggies in the saucepan with a little oil before adding the rice.
  • Replace half or all of the cooking water with low-sodium chicken or vegetable broth.
Another great vehicle for steamed vegetables is fresh pasta sauce. Our handout offers lots of ways to create your own. Why bother with cooking from scratch? Well, most canned and bottled sauces pack quite a sodium punch!
  • Newman’s Own Tomato and Basil Bombolina Pasta Sauce has over 1,240 mg of sodium per cup. Since the package contains 2.5 cups of sauce, that means that the whole jar has 3,100 mg of sodium!
  • Buitoni’s All Natural Alfredo Sauce manages to pack 1,400 mg of sodium into a single cup of sauce!
  • Even Prego’s Traditional Pasta Sauce contains over 960 mg of sodium in a simple cup.
  • Considering that the Dietary Guidelines for Americans recommend that most people consume no more than 1500-2300 mg of salt per day, these sauces can really upset the daily balance!


Thai Noodles

The end of the year is upon us (already??). Since the better half was traveling on the 31st, we decided to have a quite dinner at home instead of going out. At least we heard each other speak this way :-)
I decided on an Asian menu, veering more towards Thai. Both my husband and I love Thai food. Perhaps its the use of coconut milk (a primary ingredient in our coastal cuisine), or perhaps its our love for good food in general!

I came across this recipe on Epicurious - a recipe source I keep going back to, despite the shelf crammed with cookbooks. I used chunky peanut butter because that's what I had. I think it proved beneficial in the end because it gave the noodles a wonderful texture.

I suppose the noodles can be made with any veges but try not to omit the snow peas, they really add flavor. All in all paired with Californian zinfandel and Haagen Daz coconut ice cream it was a wonderful new year's eve.

noodles
THAI NOODLES
(serves 2-3)
1 tsp oil
2 tsp minced fresh ginger
2 cloves garlic, peeled and minced
1 tbsp soy sauce (preferably low-sodium)
4 tsp rice vinegar
1/2 tsp red pepper flakes
1/3 cup chunky peanut butter
1/2 cup chicken/ vegetable broth
8 oz whole wheat spaghetti
1 red bell pepper, julienned
1 cup snow peas
3-4 baby carrots, julienned
salt to taste
oil

Cook spaghetti as per directions. When almost done add bell pepper, carrots and snow peas. Cook 1-2 minutes more. Drain.

Heat oil in a saucepan. Add ginger and garlic; stir. Add soy sauce, vinegar, chili flakes, peanut butter, broth, and salt. Cook until peanut butter dissolves.

Simmer over low heat for 7 minutes until thick. Add pasta and vegetables and toss in peanut sauce until everything is well coated.

* Be careful when seasoning the noodles - both soy sauce and broth already contain salt

Orange Bread

bread5
As a rule the words 'low calorie' draw my immediate and unwavering attention to a recipe but when they precede the words cake, cookie or quick bread, I do a happy jig and start preheating the oven :-)

This recipe for orange bread is from an issue of Cooking Light and has no butter. Yes you read that right - no butter. This absence is not substituted by a lot of oil; just 1 tablespoon.

Now one wouldn't necessarily tweak a recipe that sounds so good does it? But I couldn't resist myself. I used a mix of whole wheat flour and all purpose and reduced the sugar. Then I began to worry that I had experimented too much. I know, I am weird that way.

The bread still rose beautifully and tasted great, especially the crunchy coconut. Perfect for brunch, afternoon snack or whenever you wish to nibble on something sweet.


ORANGE QUICK BREAD
(makes one 9 x 5-inch loaf)
3/4 cup sugar
1 egg
1 tbsp canola oil
1/4 cup milk
1 (8 oz.) carton orange yogurt
1 1/2 cups all purpose flour
1/2 cup whole wheat flour
1/4 cup + 1 tbsp flaked, sweetened coconut
2 tsp grated orange rind
1 tsp baking soda
1/2 tsp salt

Preheat oven to 350°F. Grease loaf pan. Combine sugar, oil and egg in a bowl and whisk till smooth. Stir in yogurt and milk.

Lightly spoon flour into measuring cup and level with a knife (as opposed to scooping from container). Combine flour, coconut, orange rind, baking soda and salt. Make a well in the centre and add milk mixture.

Stir until just moist. Spoon batter into greased 9 x 5-inch loaf pan. Sprinkle 1 tablespoon of coconut on top. Bake at 350°F for 40-45 minutes or until tester inserted in the centre comes out clean.

Cool in pan for 10 minutes. Cut in slices and serve (it's divine warm and topped with a little orange marmalade :-))

* Original recipe calls for 1 cup sugar
* Using whole wheat flour will yield a denser bread
* Since I didn't find an 8oz. carton of orange yogurt I used 6oz. orange yogurt plus 2oz. vanilla yogurt

Bittersweet Love - Dill Dosa

Sneaky tactic 1: add leafy vegetable to dal
Sneaky tactic 2: add leafy vegetable to idlis, dosas & parathas
Amaranth, turnip, pumpkin, drumstick, sour greens... I'd see them in the grocery bag, decide I wasn't going to take a bite and then wipe my plate clean! Mothers... they would make impressive politicians no?

If you turned up your nose at the mere mention of dill, remember 'never say never'. These dosas are more like spongy, slightly sweet pancakes that taste only faintly dill-y (somewhere my English teacher is frowning at that line).

By the way sneaky recipes are very flexible so use brown sugar in place of jaggery or increase the amount of dill (as if that's going to happen!)
dillpole
SHAEPI POLE (Sweet Dill Pancakes)
(makes 5-6)
1 cup rice
1/4 cup beaten rice (poha)
1/3 cup coconut, grated
1 cup dill, picked and washed
2-3 cardamom pods
grated jaggery (between 4 tbsps to 1/3 cup depending on taste or brown sugar)
pinch of salt
oil

Soak rice overnight or for a minimum of 3-4 hours. Drain and wash then place in blender. Coarsely chop dill. Add to rice along with washed poha, coconut, cardamom and jaggery. Grind to a smooth paste with just a little bit of water.

Remove in a bowl. Season with salt and mix well. Cover and set aside for 15-20 minutes. Heat a griddle with oil. Pour a ladleful of the batter in the centre. Let it spread into a thick circle.

Cover and cook on moderate heat. Flip over and cook on the other side. Serve hot with a dollop of homemade ghee. Or honey or maple syrup ...

Iced lemon curd layer cake

Iced lemon curd layer cake
Try Delia's delicious lemon cake recipe filled with homemade lemon curd.
Equipment and preparation: You will need to grease two 18cm/7in sandwich tins 4cm/1½in deep, lined with baking parchment, also greased.

INGREDIENTS

For the cake
For the lemon curd
For the icing

PREPARATION METHOD

  1. Preheat the oven to 170C/325F/Gas 3.
  2. Measure all the cake ingredients into a mixing bowl and beat - ideally with an electric hand whisk - until you have a smooth, creamy consistency. Then divide the mixture evenly between the two tins and bake them on the centre shelf of the oven for about 35 minutes or until the centres feel springy when lightly touched with a little finger.
  3. While the cakes are cooking, make the lemon curd, place the sugar and grated lemon zest in a bowl, whisk the lemon juice together with the eggs, then pour this over the sugar. Then add the butter cut into little pieces, and place the bowl over a pan of barely simmering water. Stir frequently till thickened - about 20 minutes. You don't have to stay with it - just come back from time to time to give it a stir.

  4. When the cakes are cooked, remove them from the oven and after about 30 seconds turn them out on to a wire rack. When they are absolutely cold - and not before - carefully cut each one horizontally into two using a sharp serrated knife. Now spread the curd thickly to sandwich the sponges together.
  5. For the icing, begin by removing the zest from the lemon - it's best to use a zester to get long, curly strips. Then sift the icing sugar into a bowl and gradually stir in the lemon juice until you have a soft, runny consistency.
  6. Allow the icing to stand for 5 minutes before spreading it on top of the cake with a knife, almost to the edges, and don't worry if it runs a little down the sides of the cake. Then scatter the lemon zest over the top and leave it for half an hour for the icing to firm up before serving.